Setting Up Enhanced Conversions is an essential strategy for optimizing your marketing efforts and maximizing the accuracy of your conversion tracking.
Google has introduced Enhanced Conversions as a key feature to improve the precision of conversion data, particularly in a landscape where privacy regulations and user consent play a significant role. This makes it crucial for businesses leveraging Google Ads to implement Enhanced Conversions to stay competitive and compliant.
In this article, you'll receive a comprehensive guide on what Enhanced Conversions entail, how they function, and the step-by-step process of setting them up using Google Tag Manager.
Free Video Course: Setting Up Enhanced Conversions
What is Enhanced Conversions?
Free Video Course: What is Enhanced Conversions?
Enhanced Conversions is a tool used in digital advertising to better track what happens after someone clicks on an ad. Think of it as a way to get a clearer picture of how effective your ads are by using data you already have about your customers.
Here's how it works: when someone interacts with your ad and then makes a purchase or signs up on your website, Enhanced Conversions takes the customer information you already have, like their email address or phone number. This information is then turned into a secure code (so no personal details are shared) and matched with the data from the ad platform. This matching process helps to more accurately track which ads are leading to real results.
Here is some of the benefits listed:
- Better Accuracy: You get a more accurate count of how many people are actually converting after seeing your ads. This helps you know which ads are really working.
- Improved Budgeting: With better tracking, you can spend your advertising money more wisely, focusing on the ads that bring the best results.
- Targeted Advertising: By understanding the customer journey better, you can create more personalized ads that are more likely to engage your audience and lead to conversions.
- Privacy Safe: Even though you're using customer data, it's handled in a way that keeps their personal information secure and private.
In simple terms, Enhanced Conversions helps you see which ads are doing their job and reaching the right people, making your advertising more effective and efficient.
How does Enhanced Conversions Work?
Enhanced Conversions integrates first-party customer data with your digital advertising platforms to provide a more accurate and comprehensive measurement of conversion events. The process begins when a user interacts with an ad and subsequently performs a conversion action on your website, such as making a purchase or filling out a form. At this point, specific first-party data points like email addresses, phone numbers, names, and addresses are collected.
Once this data is gathered, it undergoes a process called hashing. Hashing uses algorithms such as SHA256 to convert the data into a fixed-size string of characters. This process is one-way, meaning that the original data cannot be retrieved from the hashed values. For instance, an email address like:
user@example.com
will be hashed into something similar to this:
2c6ee24b098bcdcf71a5dd6a7d86ac6a31e32f4f357d1c3d1f1a7d63b8c3bf29
.
The hashed data is then securely transmitted to the advertising platform, ensuring that no raw personally identifiable information (PII) is exposed during the process. Once the advertising platform receives the hashed data, it matches it against its own user data, which is also hashed using the same algorithm. This matching process helps identify which ad interactions are associated with which conversion events, enhancing the accuracy of attribution.
After the matching is complete, the advertising platform attributes the conversions to the corresponding ad interactions. This enhanced attribution data is then used to provide detailed reports, enabling advertisers to understand the performance of their campaigns better. By linking ad interactions to conversion events accurately while maintaining user privacy through secure hashing techniques, Enhanced Conversions allows advertisers to gain deeper insights into their campaigns, leading to improved targeting and optimized ad spend.
Create a Google Ads Conversions Action Inside Google Ads
Free Video Course: Create a Google Ads Conversions Action
To complete the Google Ads conversion tag in Google Tag Manager, we need a Conversion ID and Conversion Label in order to connect
whatever has been triggered on the webpage to the conversions which are being measured in Google Ads.
- Select Goals from the right menu bar.
- Go to Settings.
- Click on Enhanced Conversions.
- Turn on Enhanced Conversions and press Save.
- Go back to the Summary page.
- Select New Conversion Action.
- Choose Website.
- Scan your domain when prompted.
- In the box labeled Create conversion action manually using code, select Add a conversion action manually.
- Complete the Conversion Action setup.
- Click Save and Continue.
- Choose Use Google Tag Manager to get your conversion ID and conversion label for finishing the setup in Google Tag Manager.

What is Data Fields?
Free Video Course: What are Data Fields?
Data fields are simply the input fields in a contact form where users can enter information such as their name, phone number, and email address.
Understanding what data fields are is important because it allows us to identify and use the information entered by users as input, which can then be securely forwarded to Google Ads in a hashed format.
Each data field, also known as an input field, has an associated HTML ID or class. We need to identify this ID or class so that it can be used in a script to save the user’s input into a JavaScript variable.
In this article, we will focus on forwarding the input from the email data field.
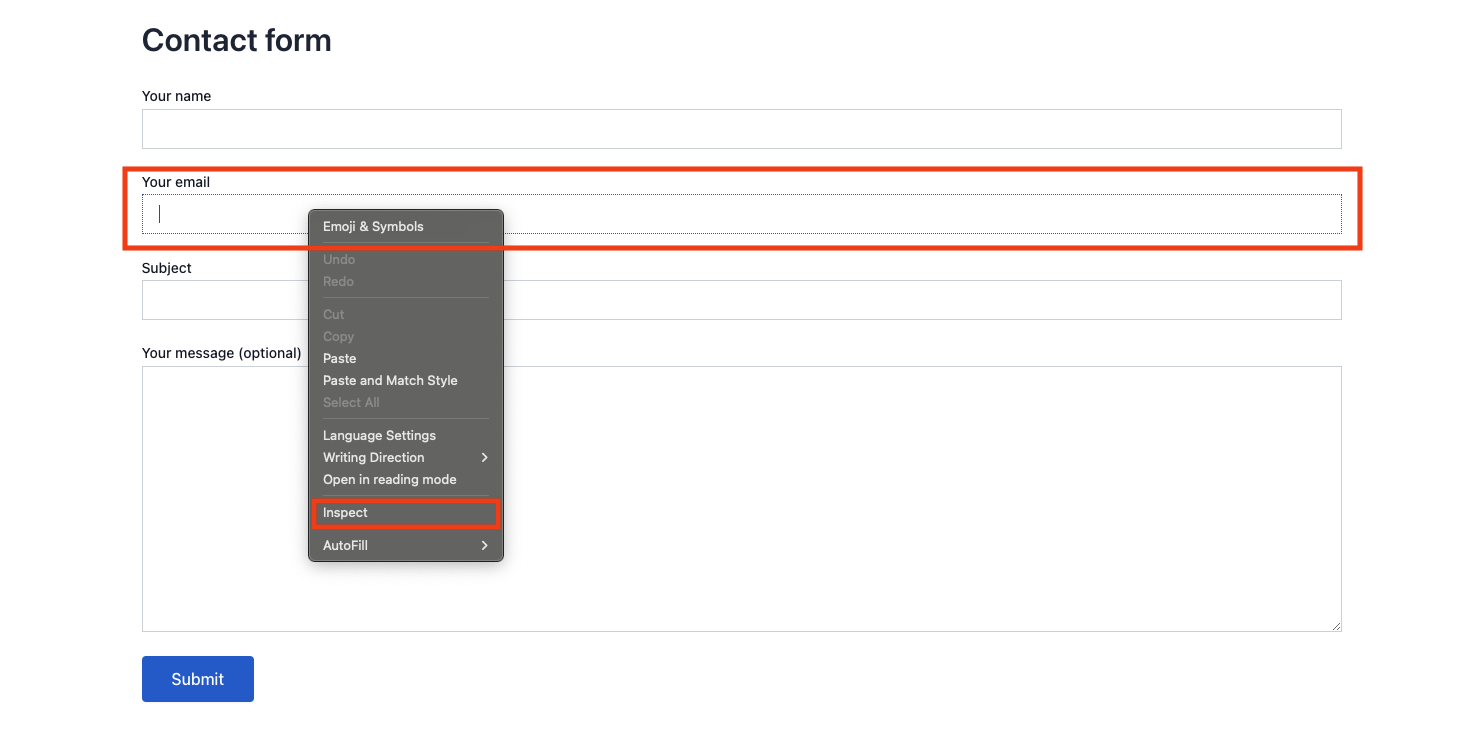
By right-clicking on the data field and selecting "Inspect"—assuming you are using Google Chrome as your browser, though many other browsers have a similar feature—the Chrome DevTools will appear. The data field’s HTML will be highlighted, allowing you to find the class or ID associated with that particular data field.

In this example, we're working with a contact form created using WordPress and the Contact Form 7 plugin. The form contains multiple classes, so we'll focus on selecting the class that is most unique to the specific data field we've identified.

Have this class name ready because we are going to use it in the next step.
How to Use the Enhanced Conversions Script Generator
Free Video Course: Using the Script Generator
We've developed a script generator to help you create a script that can be used in Google Tag Manager. This script will save users' inputs into a JavaScript variable, allowing these inputs to be securely forwarded to Google Ads as hashed user data, which is essentially what Enhanced Conversions are.
View the app: Enhanced Conversions Script Generator
In this case we are going to generate a script for the data field where the user can type in their email with the following steps:
- Select JavaScript Variable as the script type.
- Select Class as the Div Identifier.
- Select Email as the input.
- Insert wpcf7-email which you discovered earlier in Chrome DevTools.
- A script should now be generated for which you can copy to your clipboard.
How to Implement the Script and Create JavaScript Variables
Free Video Course: Implement and Create JS variables
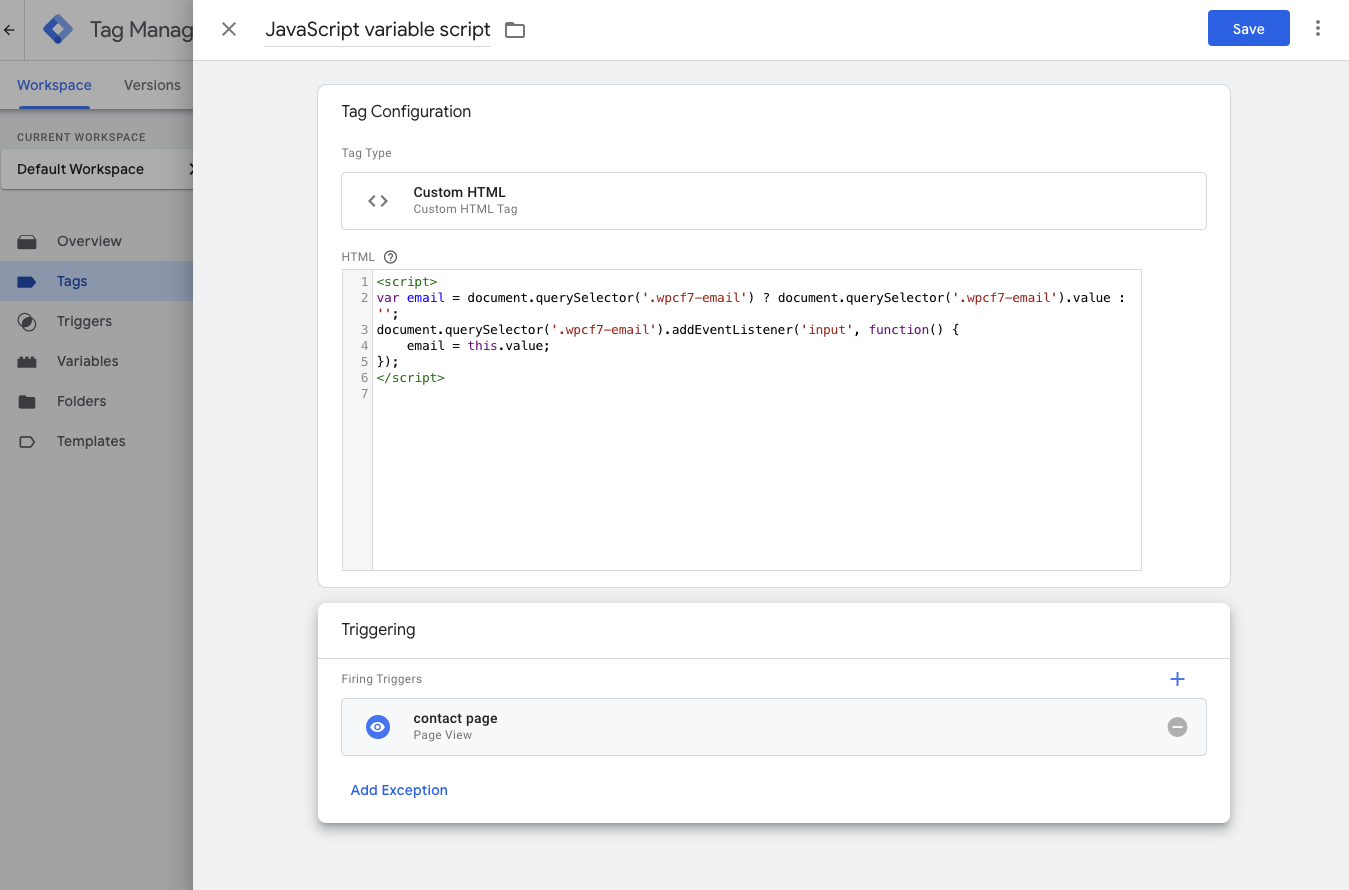
- Create a new Custom HTML tag in Google Tag Manager and insert the script that you copied to your clipboard earlier.
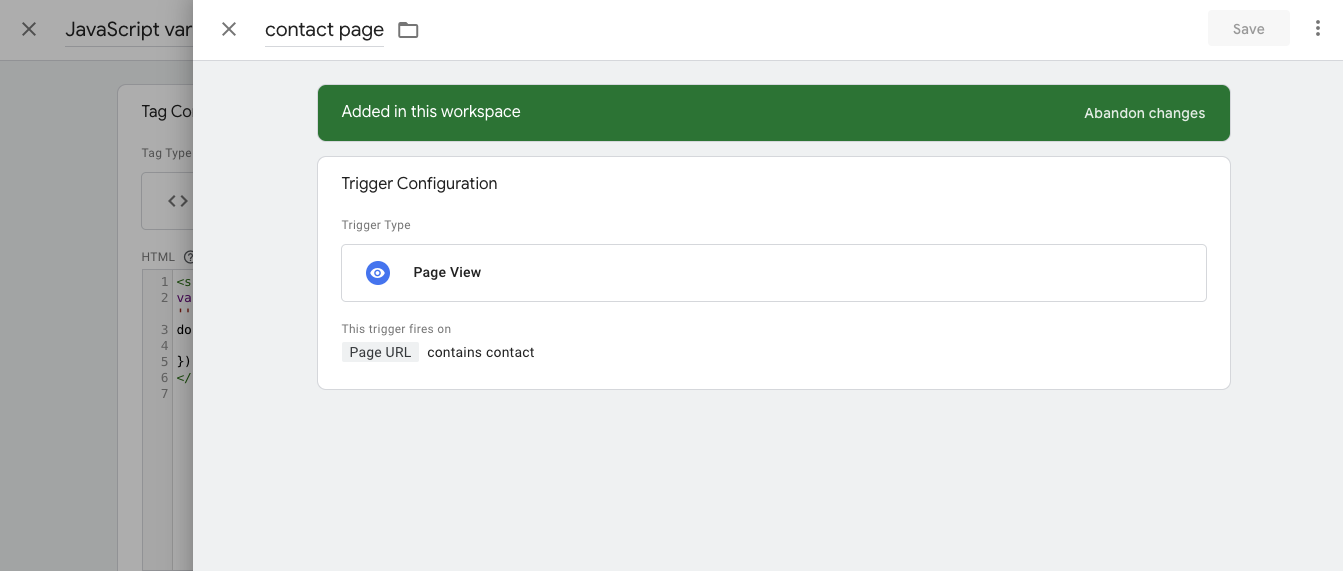
- For the trigger, choose Page View.
- Select to fire the trigger on Some Page Views.
- Narrow down the page view by selecting Page URL.
- Specify that the Page URL contains the unique part of the URL for your specific contact page.
Below is an example of how to insert the script and configure the trigger:
Here's how to set up the trigger:
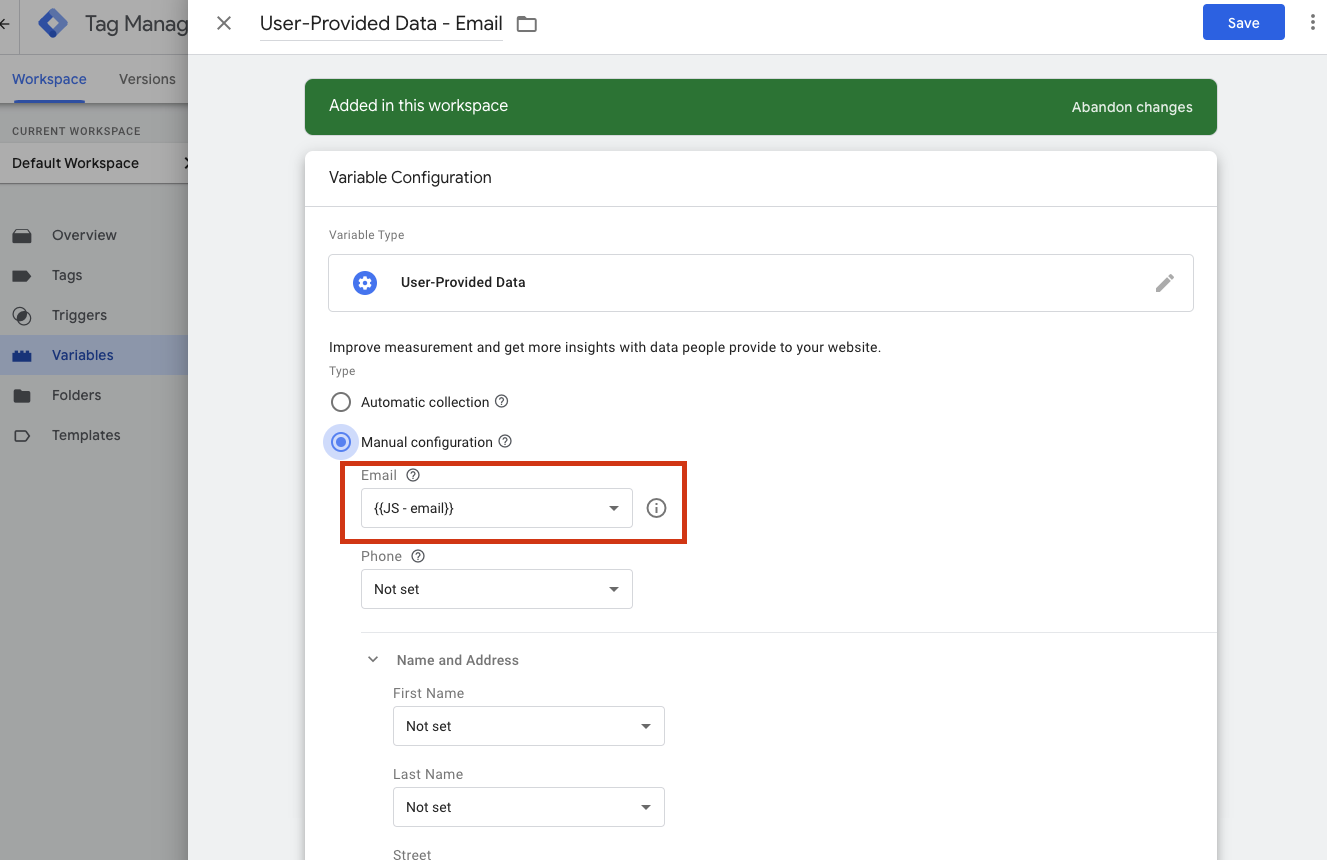
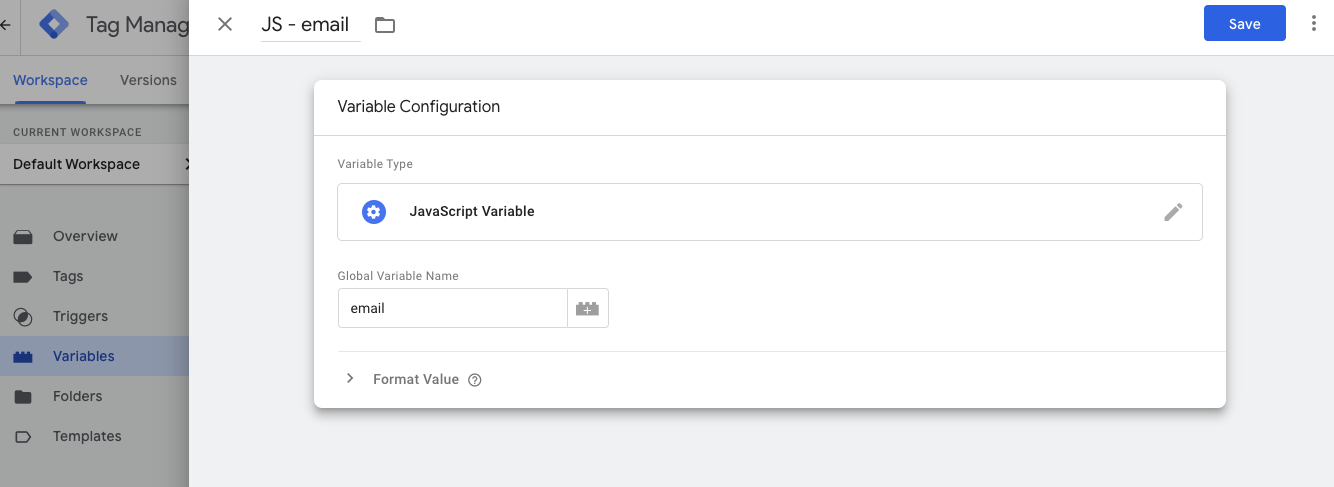
Once the script has been inserted on the page via the Google Tag Manager Custom HTML tag, you can proceed to create the JavaScript variables in Google Tag Manager:
- In Google Tag Manager, go to Variables.
- Under User-Defined Variables, click New.
- Give the variable a name, then select JavaScript Variable.
- Enter email as the variable name and press Save.
How to Test if Enhanced Conversions has been Applied
- To test if what we have set up in Google Tag Manager works. We need to start with opening Preview Mode which you'll find in the top right corner inside Google Tag Manager.
- Once Preview Mode and Tag Assistant is up and running you can carry out your test and complete your contact form.
- When you have completed your contact form you can go to Tag Assistant
- The Tag needs to be fired first of all. If the Tag has been fired correctly. You can click the tag which has been fired and select Show More and then find cssProvidedEnhancedConversionValue. If you find the test email you entered here. Then you have set it up correctly.

What Does Datalayer Mean?
A data layer is a special area where important information about a website and its users is stored in a structured way. It acts like a "holding area" or "storage box" for data that you want to track or use with tools like Google Tag Manager or Google Analytics.
For example, when someone adds a product to their shopping cart, the data layer might store details about the product, such as its name, price, and category. This information can then be easily accessed and used to send data to analytics tools, track user actions, or trigger specific events on the website.
In simple terms, the data layer helps organize and manage the information on a website, making it easier for tracking tools to understand what’s happening and react accordingly.
Which Ecommerce Events Can You Setup Using The Datalayer?
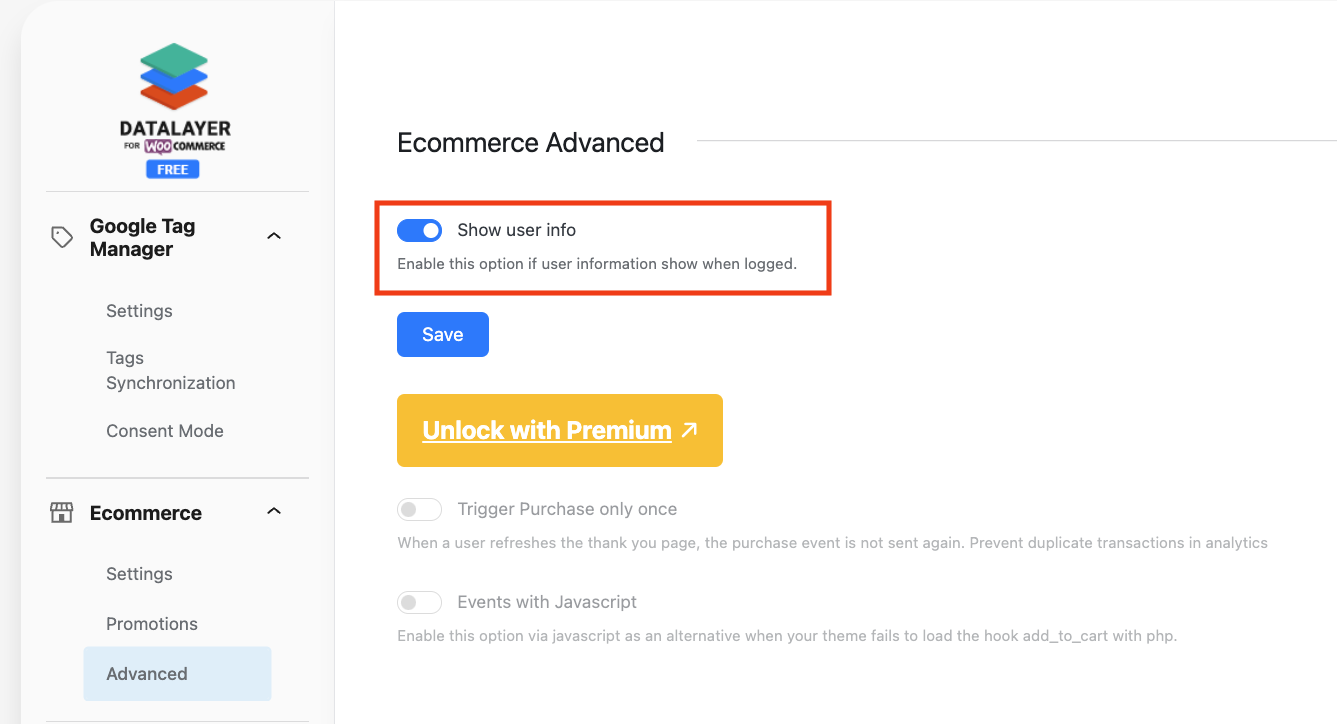
WooCommerce, when integrated with Google Tag Manager or Google Analytics (often through plugins like Datalayer for WooCommerce FREE), pushes several important ecommerce events into the data layer. Inside the plugin settings you can go to advanced and then enable show user info which is something you can use to apply the user data to the tag. These events help track various stages of the customer journey on an ecommerce site. Some of the common WooCommerce ecommerce events that are pushed into the data layer include:
- impressions:
Triggered when products are viewed on a category page, homepage, or any product list view. It contains information about the products being displayed.
- productClick:
Triggered when a user clicks on a product from a list of products, such as a category or search results page.
- view_item (or detail):
Triggered when a user views the details of a single product on the product page.
- add_to_cart:
Triggered when a user adds a product to their cart. It includes details about the product, such as the name, price, and quantity.
- remove_from_cart:
Triggered when a user removes a product from their cart.
- begin_checkout:
Triggered when a user starts the checkout process.
- checkout_progress:
Triggered as the user moves through the checkout steps (such as providing billing information, selecting shipping options, etc.).
- purchase (or transaction):
Triggered when a purchase is completed. It includes comprehensive details about the transaction, such as the total amount, products purchased, quantity, and transaction ID.
- refund:
Triggered when a refund is processed, providing details about the refunded products.
How to Use the Datalayer to Set up Google Ads or GA4 Ecommerce Events
Free Video Course: Setting Up Enhanced Conversions
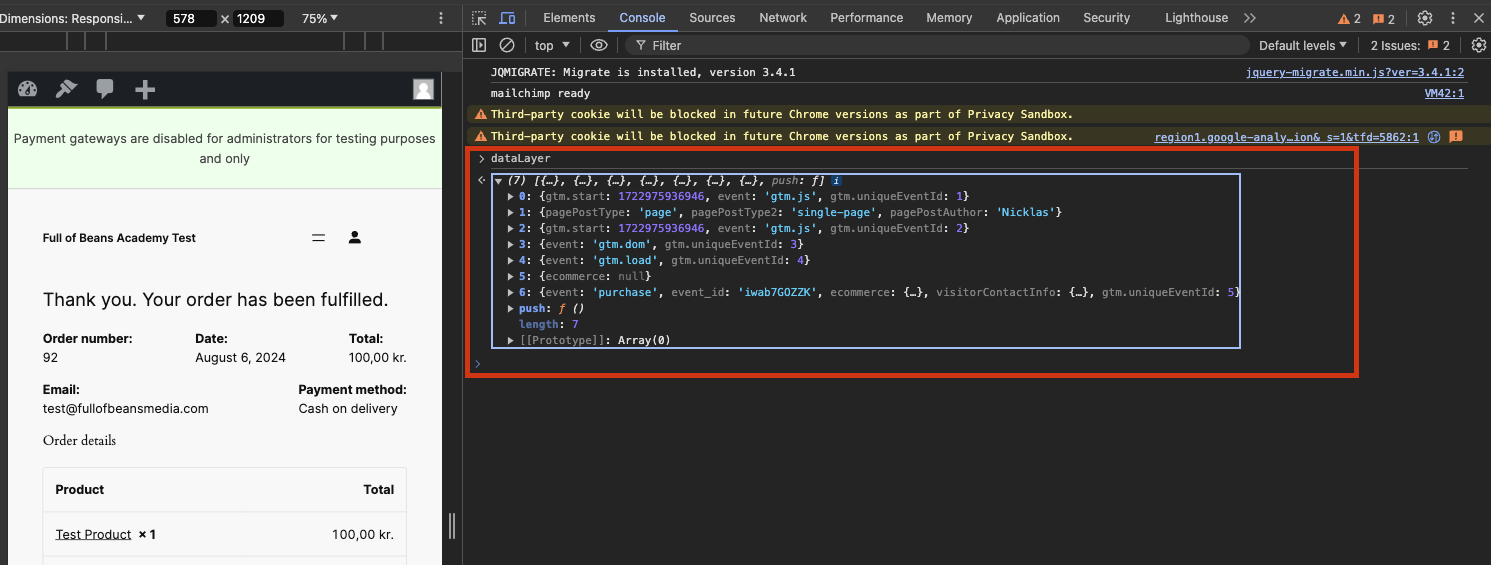
After completing a test purchase using WooCommerce you'll arrive at the order confirmation page where you can do the following step to observe what has been sent to the datalayer.
- Using Google Chrome you can then right click the page and choose inspect which will open Chrome DevTools.
- Go to console.
- type in datalayer and press enter.
- You'll then be able to observe what has been sent or pushed into the datalayer.
How to set Up a Google Ads Ecommerce Purchase Event Trigger
Free Video Course: Setting Up Enhanced Conversions
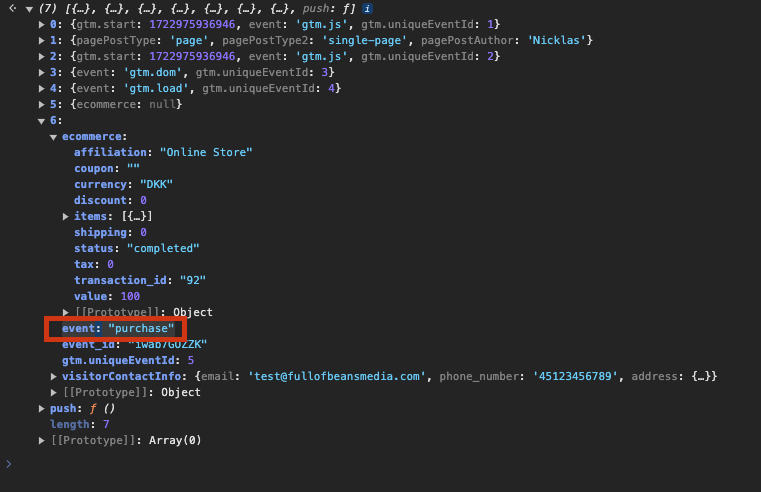
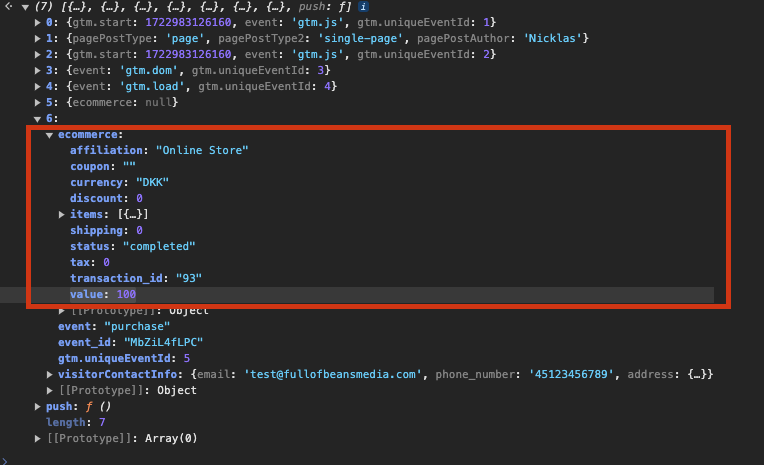
If you take a closer look at what you see in the datalayer - you should be able to
see that an event has been pushed into the datalayer along with an event name.
We'll use the event name to create a Custom Event trigger.
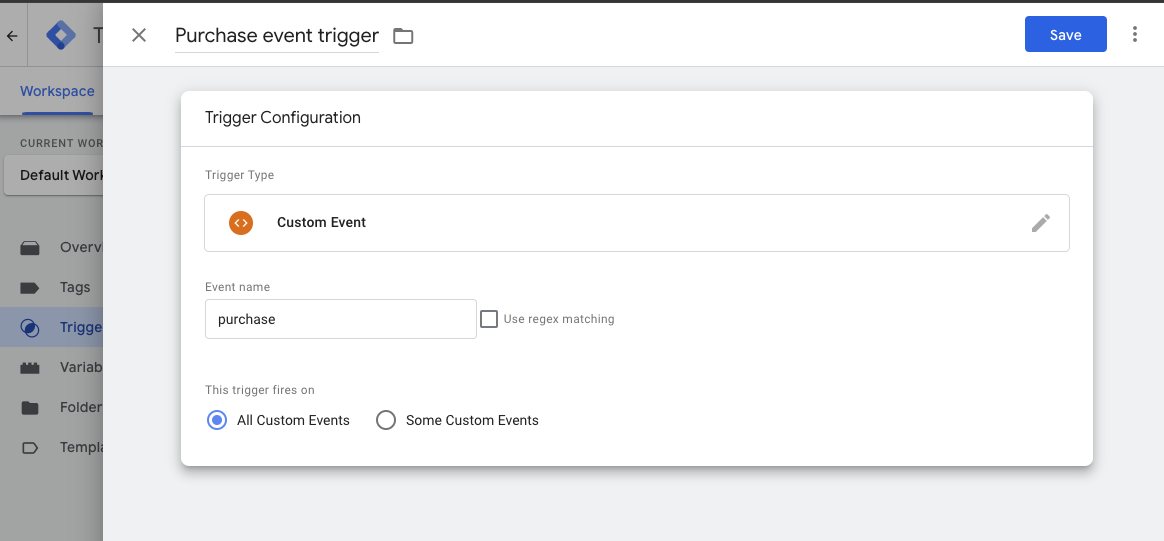
If you take a look at the screen shot below you'll find that the event name is purchase.
Now when you know the name of the event, you can then move on to Google Tag Manager
and create the event trigger when then may apply on your Ecommerce Conversion Tracking Tag by:
- In Google Tag Manager go to Triggers.
- Then select New.
- Give the trigger a suitable name like Purchase event trigger.
- Then choose the trigger type: Custom Event.
- Here you can insert the event name you found in the datalayer, which in this case was purchase.
How to Add Ecommerce and User Data to the Google Ads Ecommerce Purchase Event
Free Video Course: Setting Up Enhanced Conversions
Before we create the tag, which in this case will be a Google Ads Conversion Tracking Tag,
we'll have to create the Datalayer Variables for the data entries we'll like to apply on the Google Ads Conversion Tracking Tag such as the value of each order, the transaction ID,
and user data such as email which in particular is the key element in setting up Enhanced Conversions.
Here is how to create the datalayer variables:
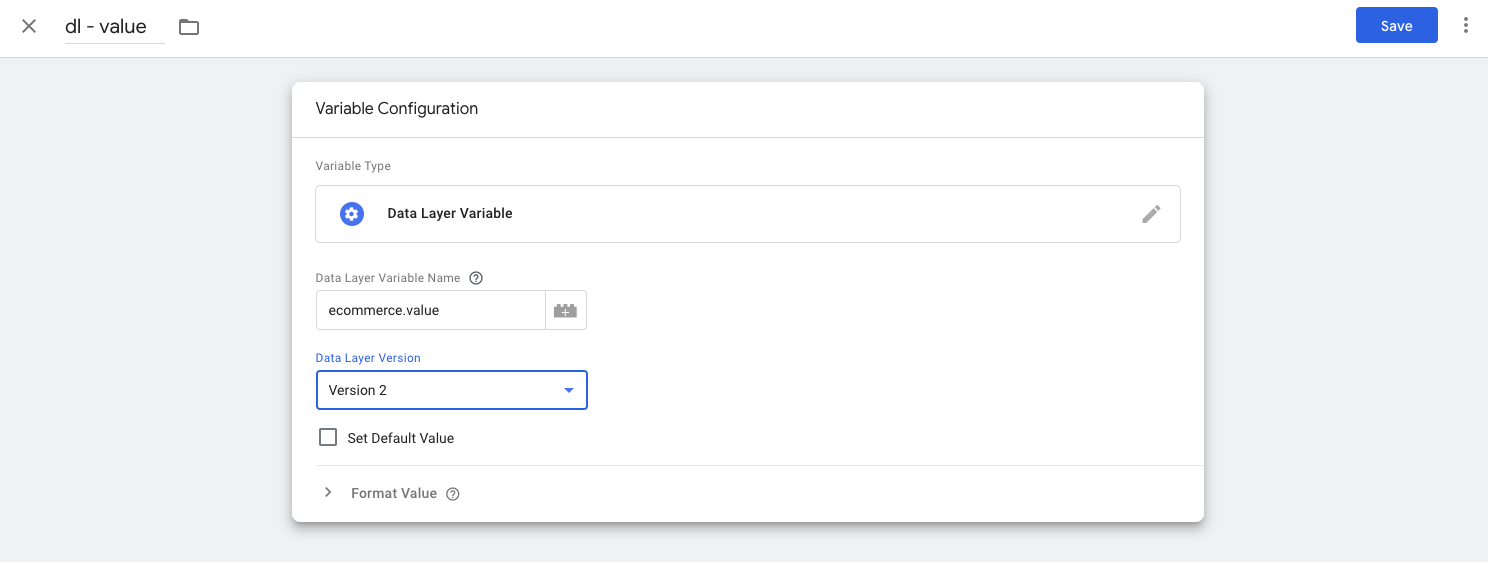
Setting up the datalayer variable: "dl - value"
- In Google Tag Manager Go to Variables.
- In the box called User-Defined Variables, select New.
- Give the variable a sutiable name such as dl - value.
- Choose the variable type Data layer Variable
- Now you are able to type in the Data Layer Variable Name. To figure out what that name is you'll need to examine the image below. In the image
below, you'll observe that the key called value is inside the object called ecommerce, therefore we must write ecommerce.value as the Data Layer Variable Name.
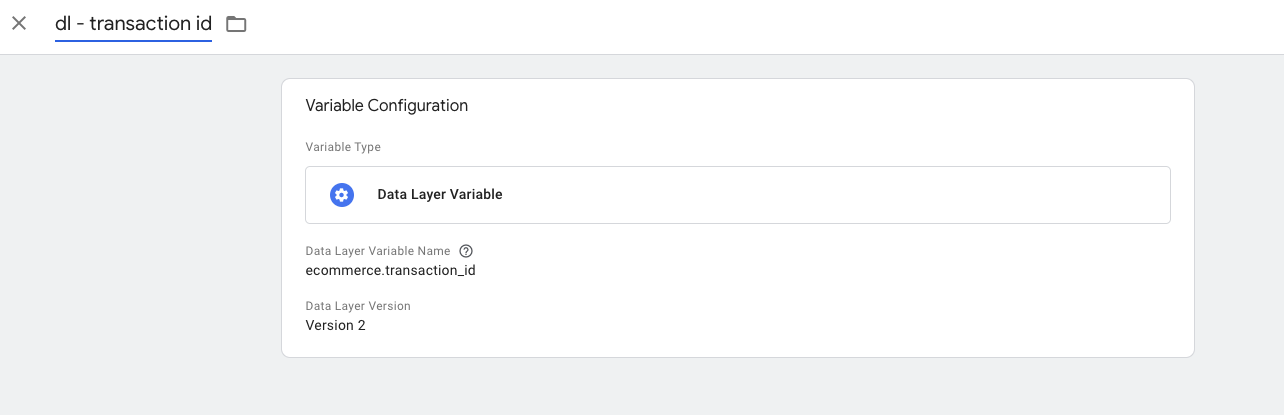
Setting up the datalayer variable: "dl - transaction_id"
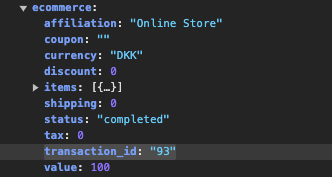
- Follow the same step as before and create a new varialbe which you can call something like dl - transaction_id.
- TheData Layer Variable Name will be ecommerce.transaction_id which you can observe in the image below.
Setting up a Datalayer Variable: "dl - user info - email"
Earlier it was showed how you enable user data to be pushed into the datalayer with the WordPress plugin Datalayer for WooCommerce FREE.
- In Google Tag Manager Go to Variables.
- In the box called User-Defined Variables, select New.
- Give the variable a sutiable name such as dl - user info - email.
- Choose the variable type Data layer Variable.
- Now you are able to type in the Data Layer Variable Name. To figure out what that name is you'll need to examine the image below. In the image
below, you'll observe that the key called email is inside the object called visitorContactInfo, therefore we must write visitorContactInfo.email as the Data Layer Variable Name.

Setting up a User Data Variable: "User Data - Email"
- In Google Tag Manager go to Variables.
- In the box called User-Defined Variables, select New.
- Give the variable a sutiable name such as User Data - Email.
- Choose the variable type User-Provided Data.
- You can then change Email from Not Set to the datalayer variable which you created earlier dl - user info.
Finishing the Google Ads Conversion Tracking Setup
Now when we setup all the datalayer variables and the User-Provided data varialbe,
we can then complete the setup up by adding the variables to the Google Ads Conversion Tracking Tag. Here is how:
- In Google Tag Manager go to Tags.
- select New.
- Give the tag a suitable name such as Google Ads Event - Purchase.
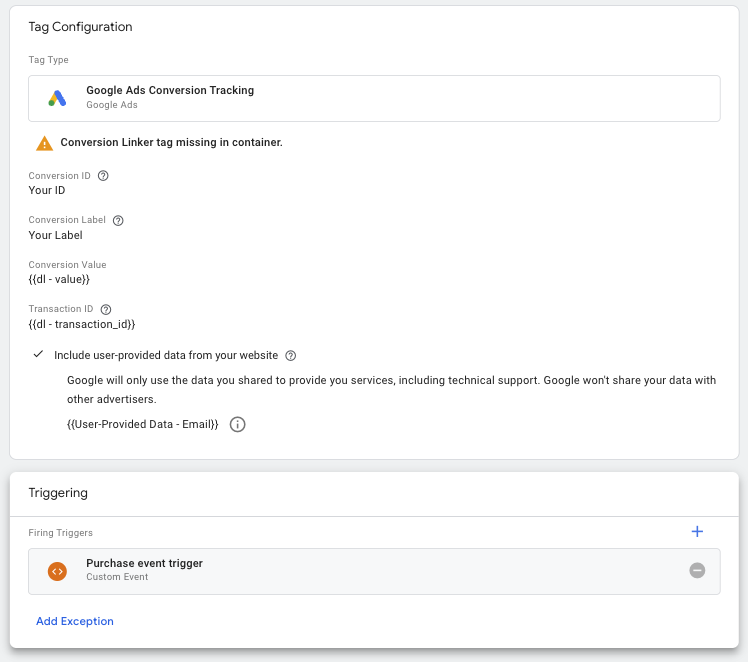
- Choose the tag type Google Ads and then Google Ads Conversion Tracking.
- You have to insert the Conversion ID and Label which this article showed how to obtain earlier in this article.
- Since we have already created the datalayer variables, all you need to do is to add the datalyer varible dl - value to the field Conversion Value.
- In the field Transaction ID you can then add the datalayer variable we created with the name dl - transaction_id
- Then you put a tick on the box called Include user-provided data from your website and then add the User-Provided Data variable which we called User Data - Email.
- Before we save the tag you'll have to add the trigger, which we have also created earlier in this article. We created a trigger called Purchase event trigger.
- Hit Save and you have completed the setup.
How to Test if Enhanced Conversions Has Been Set Up Correctly
Free Video Course: Setting Up Enhanced Conversions
Now when we have completed the setup it's time to test if everything has been setup correctly.
We are going to open Preview Mode and do another test purchase and then observe what happens in Tag Assistant.
- In the top right corner select Preview Mode.
- Type in link to the page you are going to test.
- About now you should have a connected Preview Mode open and then the Tag Assistant open.
- Now you can complete a test purchase.
- Observe the Summary in Tag Assistant.
- You should be able to see purchase on the page called Order Confirmation. Click on Purchase.
- Then you should be able to see that Tag has been fired. Click that tag.
- Click Show More under the table called Properties.
- If the setup has been completed correctly you should be able to see the email you typed in under cssProvidedEnhancedConversionValue.